• Home
  • Galleries
  • Mark's Blog
  • Sketch Book

Mark Cassino Photography - Mark's Blog

Posted by mcc on Dec 17 2007 in Snow Crystal Photography, Snowflake Photography
  • « Signature Gallery 2007 Wrap Up
  • Signature Gallery 2007 ! »

First Snow Crystals - Winter 2007/08

10:45 on a Saturday night. I’m resting on the couch, the dying embers of once hot fire glow nearby – the residual warmth of the fireplace filling the room. The Christmas tree is lit and the holiday decorations are up. The credits roll on the television… and  I peek out the window…

It’s snowing…

The forecasters have been calling for this – and it is December after all. So I don a pair of flip flops and step out into the 20 degree winter air, throw open the garage door, and grab a piece of glass to test the snow crystals. They look good, so it’s time to get to work.

I’ve been preparing for this for a while. The tripod with macro rails, bellows, and extension tubes, has sat on the table in the garage all year. A few weeks ago I cleaned up the table, and just this day I washed up the glass squares, bought a bit of blue plastic (a report cover) and mounted the lens on the end of the extension setup. Not much to do now – I gather together the flash, ttl cords, and *ist-D camera, and head out into the cold.

Ultimately, the snow disappoints. In the course of a couple of hours the crystals range from small, well formed but irregular; to huge, half inch specimens; to puffy bits of sleety powder. But it was a good session still – though none of the shots are first rate, the system is in place. Come the next snow, I’m ready to just start shooting.

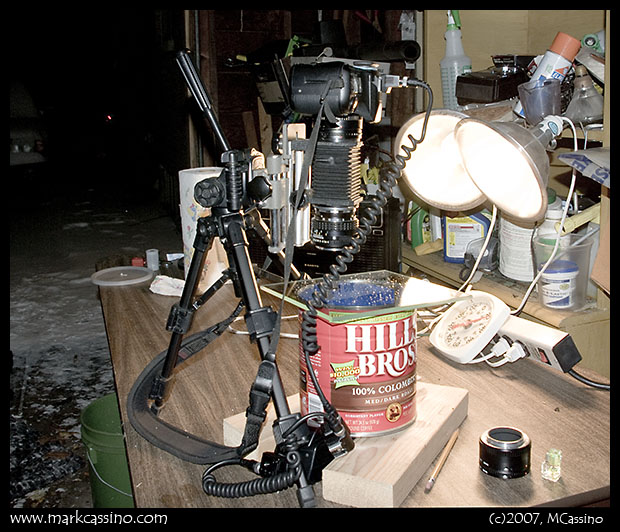
Here is a photo of the snow crystal photography rig that I use. Not high tech at all.

In a nutshell, you have a small tabletop tripod, a set of macro focusing rails mounted on that, and a bellows set mounted to the rails. Extension tubes snap onto the bellows. The setup in the photo was for the huge, half inch crystals, so the bellows are scrunched down and the unused tubes are on the table. For smaller crystals the bellows would be fully extended and more tubes (many times what is shown) would be added.

Snow Crystal Photo Setup

On one end of the tubes/bellows is the digital SLR – a Pentax *ist-D in this case.  At the other end of the tube is the optic – a Pentax M Series 50mm f4 macro. It is a bit slow, but the lens is devilishly sharp.

A flash is hooked up to the camera via TTL cables. The flash lays on the table pointing up into the coffee can. The lid to the can is inside it, acting as a diffuser. A piece of blue plastic is repositioned to change the coloring of each shot. It’s not visible, but in the photo above it is just pressed against the side of the can. The two-by-fours hold the can up enough for the flash to be snuck under it.

The camera is just set to manual mode. Shutter speed is 1/125, aperture is manually stopped down to f11 to f22. TTL flash takes care of the exposure.

Snow crystals are caught on the glass plates (look closely, you can see them) – the cool fluorescent lights make everything bright enough to focus the images. On the table is the level that’s used to line things up – the glass plate and the film plane in the camera. You could spend a lot of time trying to find a level table, but it’s all relative so I let everything be tilted, just tilted in harmony.

While this is not a very high tech system, it is a far cry from my first snow crystal setup which was built around a Pentax Spotmatic and manual flash - with exposure controlled by adjusting the flash to subject distance. Some fun back in the film days, lo some 8 or 9 years ago. The snow is in the air, outside, far left of this image… And that’s it… let’s hope for more snow, and more snow crystal shots.

Additional Notes, February 2016:

I still refer people to this post when they ask about my snow crystal setup, so here’s an update regarding some advancements in the process.

Manual flash vs TTL: Newer Pentax bodies no longer support TTL flash when using a reverse mounted lens - the newer P-TTL system requires the lens to be mounted and communicating with the camera body. I now use manual mode and just do a few test exposures to determine the correct setting for the lens.

Aperture: These days I only stop down to f5.6 or sometimes f8 to avoid the effects of diffraction. Back in 2007 I was stopping down too much, chasing depth of field but also getting softness in the images.

Shutter Speed: Shutter speed is set to X-Sync, which is the fastest speed that will work with flash. This setup is gangley and prone to vibrations, so I prefer to work at night and drop a piece of black foam core in front of the two lights that are there to help with focusing.  I use an IR remote on the 3 second delay to minimize vibrations. That plus lighting the subjec tonly with flash minimizes motion blur.

Focus stacking: With a more open aperture and less depth of field I sometimes use focus stacking but that is the exception - the crystals are pretty flat as it is.

Lighting: I no longer use a diffuser on the flash and now use one or more lenses from colored LED lights to add color to the images.

 The camera, lens and flash unit have been continuously updated updated over the years, but otherwise, the basic setup shown above is still in use.  I’m using the exact same tripod, bellows, extension tubes tubes and coffee can. This rig actually dates back to circa 2000, when I was shooting snowflakes on slide film.

The biggest challenge remains finding well formed snowflakes. That, and staying warm!

Click here for a gallery of my 100 best snowflake photos.


This entry was posted by Mark C and filed under Snow Crystal Photography, Snowflake Photography.

5 comments

Comment from: Alunfoto Visitor

Alunfoto

Hi Mark,
Thanks for sharing this. I have been wondering about your flash setup. Neat and simple…. Mind if I borrow your idea? :-)

We haven’t had any serious snow here yet, the main bulk usually comes in January and February. But it might come any day, of course. I’ll take your post as a reminder to get started.

best,
Jostein

12/18/07 @ 03:25 Reply to this comment

Comment from: mcc Member

Mark C

Thanks, Jostein - I’m looking forward to seeing some of your shots this winter!

- MCC

12/18/07 @ 09:56 Reply to this comment

Comment from: Richard D Bush Visitor

Richard D Bush

Dear Mark,

When I ran across your web page about shooting snowflakes I got very excited. For years I’ve been going to take pictures of them but really didn’t know where to start. I bought The Little Book of Snowflakes by Kenneth Libbrecht. He uses a fancy photo-microscope, so no help there technically. The photographic collection in his book is broad in scope and includes many types that grow differently because of differing atmospheric conditions. The photos, are quite good, but certainly no better or even quite as nice as what you showed in your article.

Maybe you can make suggestions on gear. I have a new Pentax K10D body. I do not yet have an automatic TTL flash, but am considering an after-market unit that would set me back about forty bucks. I know I will additionally need a sync chord that will connect to the K10D hot shoe.

I’ve seen the little leveling do-daws that slide in the hot shoe clip and might get one of those. I do have a small torpedo level and might be able to get plate glass and focal plane plano-parallel by reading the bubble of the torpedo level off the LCD window. (Am I correct in assuming the LCD window is on the same plane as the sensor in the camera?)

I have an Asahi Pentax 50mm ƒ4 preset macro lens that will focus down to a 1:1 size on a 35mm film camera. I don’t know if this lens will still focus 1:1 when it functions as a 50mm x 1.5 and becomes equivelant focal length of a 70mm lens on a 35mm film camera. I have a set of close-up tubes and also an M42-to-K mount adapter to connect any of my old M42 lens collection to the K10D body. With these close up items, can I forget the bellows, or will I still need bellows as a way to connect the rack to the camera and lens configuration?

Any suggestions will be greatly appreciated.

Yours truly,
Richard Bush

02/08/08 @ 10:09 You are currently replying to this comment

Comment from: mcc Member

Mark C

Hi Richard -

The only drawback with the K10D is that it only supports the digital TTL flash. The *ist-D still supported both the older analog TTL flash and the newer digital. The problem is that the newer TTL flash requires a lens with contacts on the body in order to work properly. If you use your older lens and bellows set, you won’t get TTL flash. The flash will just discharge 100%.

That’s not an insurmountable problem, though. First off, if your flash unit allows you to manually adjust the power, it won’t be too hard to just set it to the proper power level and proceed. Just set up your rig, take some test shots, check the histogram, and adjust the power till the image is properly exposed. That could get to be a bit fiddly if you are moving the lights around much, but it would work.

The other option would be to just use a newer lens, not reverse mounted. You could just get a 100mm maro lens that works in auto mode (i.e. - an “A” or later lens type), some extension tubes with contacts, and reverse mount your 50mm macro onto the front of the main lens. That would quickly get you to 4x lifesized or greater magnification.

So - with the K10D you have two routes. One is to use the bellows setup like I am using, and deal with manual flash. That should not be a big problem.

Second would be to get some extension tubes with contacts, a lens that will allow for the TTL auto-flash to work, a reversing ring to allow you to mount the 50mm lens in front of the main lens. So you’d have your 50mm lens reverse mounted on a 100mm macro, that lens would be mounted on tubes, the tubes onto the camera. Then the TTL flash would work fine and you not have to fuss much with exposures.

Let me know if that makes sense! It can be difficult to explain this stuff without getting too technical.

BTW - the great advantage of using the flash is that it counteracts camera shake, so you can get away with just using a desktop tripod for support. I’ve been tempted to try just using LED lighting, but that would mean stepping up to a much better support system.

I hope this helps!

- MCC

PS: The levels are useful for getting things set up, but ultimately you have to fine tune things by eye. I would think just laying a level on the LCD would work just fine.

02/08/08 @ 15:35 Reply to this comment

Comment from: Susan Egan Visitor

Susan Egan

Hi Mark, it just snowed here today and I am looking forward to my third season of photographing snowflakes. I have
had no formal photography training and have managed to
capture these wonderful ice crystals using a Canon Rebel
digital camera body, a bellows for a Minolata manual
SLR and camera stand of sorts. I have been experiment
ing with light sources with limited success. I read your your article and saw the picture of your set up and
now am confident that by copying your coffee can and
flash set up, my pictures will improve dramatically. I
do have a question about the blue plastic film. Could
you please describe for me where it is placed in the
can? Thank you, Susan
10/22/08 @ 10:31 Reply to this comment


Form is loading...

A Photographer's Journal

  • Photo Galleries
  • Photo A Day
  • Bio
  • Exhibits
  • Contact
  • Terms of Use / Privacy Policy

The Story of Snow has its own website and blog! Take a look:

www.storyofsnow.com

  • Archives
  • Categories
  • Latest comments

XML Feeds

  • RSS 2.0: Posts, Comments
  • Atom: Posts, Comments
  • RSS 0.92: Posts, Comments
What is RSS?

Links

  • Bloggers
    • Breakfastographer
    • Knarf In The City
    • Mark Roberts
    • Plants Amaze Me
    • Urban Dragon Hunters
  • Fine Art
    • Signature Artists
  • Links
    • B2Evolution
  • Pentax Related
    • PDML Home Page
    • Pentax Forums
    • Pentax K Mount Page (formerly Bojidar Dimitrov's Pentax K-Mount Page)
    • The PUG
  • Photographers
    • Extreme Macro
    • Ken Campbell

Terms of Use / Privacy Policy

Click Here
Log in

©2025 by Mark Cassino • Contact • Help • Open-source blog

CMS + forums